


Spring事务
本文参考:Spring官方文档
事物的类型
- 本地事务:普通事务,独立一个数据库,能保证在该数据库上操作的ACID。
- 分布式事务:涉及两个或多个数据库源的事务,即跨越多台同类或异类数据库的事务(由每台数据库的本地事务组成的),分布式事务旨在保证这些本地事务的所有操作的ACID,使事务可以跨越多台数据库。
关于两者更详细的信息可以参考
Spring解决了分布式事务和本地事务的缺陷,允许应用开发者在任何环境下使用一致的编程模型,屏蔽了各个平台的差异(JDBC、Mybatis等)。
Spring同时支持编程式事务管理和声明式事务管理。
Spring事务管理接口
TransactionStatus
public interface TransactionStatus extends
TransactionExecution, SavepointManager, Flushable {
    @Override
    boolean isNewTransaction();

    boolean hasSavepoint();

    @Override
    void setRollbackOnly();

    @Override
    boolean isRollbackOnly();

    void flush();

    @Override
    boolean isCompleted();
}
TransactionStatus接口为事务代码提供了一种简单的方法来控制事务执行和查询事务状态
TransactionDefination
public interface TransactionDefinition {
    int PROPAGATION_REQUIRED = 0;
    int PROPAGATION_SUPPORTS = 1;
    int PROPAGATION_MANDATORY = 2;
    int PROPAGATION_REQUIRES_NEW = 3;
    int PROPAGATION_NOT_SUPPORTED = 4;
    int PROPAGATION_NEVER = 5;
    int PROPAGATION_NESTED = 6;
    int ISOLATION_DEFAULT = -1;
    int ISOLATION_READ_UNCOMMITTED = 1;
    int ISOLATION_READ_COMMITTED = 2;
    int ISOLATION_REPEATABLE_READ = 4;
    int ISOLATION_SERIALIZABLE = 8;
    int TIMEOUT_DEFAULT = -1;
    /* 返回事务的传播行为,默认值为 REQUIRED */
    int getPropagationBehavior();
    int getIsolationLevel();
    /* 返回事务的超时时间,默认值为-1。如果超过该时间限制但事务还没有完成,则自动回滚事务 */
    int getTimeout();
    /* 返回为只读事务,只读事务会被优化查询速度,默认值为false */
    boolean isReadOnly();

    @Nullable
    String getName();
}
TansactionDefinition定义了事物的传播行为、隔离级别等属性
TransactionMagager
public interface PlatformTransactionManager extends TransactionManager {

    TransactionStatus getTransaction(TransactionDefinition definition) throws TransactionException;

    void commit(TransactionStatus status) throws TransactionException;

    void rollback(TransactionStatus status) throws TransactionException;
}
TransactionDefinition中定义了事物的相关属性,getTransaction依此返回一个事务状态对象
编程式事务管理
@Service
public class ProgrammaticAccountServiceImpl implements AccountService {
    private final TransactionTemplate transactionTemplate;
    private final AccountDao accountDao;

    public ProgrammaticAccountServiceImpl(TransactionManager manager,
                                          AccountDao accountDao) {
        /* 保证线程安全 */
        this.transactionTemplate = new TransactionTemplate((PlatformTransactionManager) manager);
        this.accountDao = accountDao;
    }

    @Override
    public void transfer(int id1, int id2, int money) {
        /* 该事务的个性化配置 */
        transactionTemplate.setIsolationLevel(TransactionDefinition.ISOLATION_REPEATABLE_READ);
        transactionTemplate.setTimeout(2);

        /* 开始事务 */
        transactionTemplate.executeWithoutResult(transactionStatus -> {
            try {
                /* 业务代码 */
                accountDao.out(id1, money);
                int x = 1 / 0;
                accountDao.in(id2, money);
            } catch (Exception e) {
                /* 回滚 */
                transactionStatus.setRollbackOnly();
                e.printStackTrace();
            }
        });
    }
}
这种方式每个方法需要try-catch,代码侵入性很强
注意,TransactionTemplate类的实例是线程安全的,因为该实例不会维护任何会话状态。但是,TransactionTemplate实例执行了配置状态。因此,虽然许多类可以共享TransactionTemplate的单个实例,但如果类需要使用不同的设置(例如,不同的隔离级别)使用TransactionTemplate,则需要创建多个不同的TransactionTemplate实例。
声明式事务管理
@Service
public class AccountServiceImpl implements AccountService {
    private final AccountDao accountDao;

    public AccountServiceImpl(AccountDao accountDao) {
        this.accountDao = accountDao;
    }

    @Transactional(rollbackFor = Exception.class, timeout = 2, isolation = Isolation.READ_COMMITTED)
    @Override
    public void transfer(int id1, int id2, int money) {
        accountDao.out(id1, money);
        int x = 10 / 0;
        accountDao.in(id2, money);
    }
}
相比于编程式事务管理,是不是方便多了。
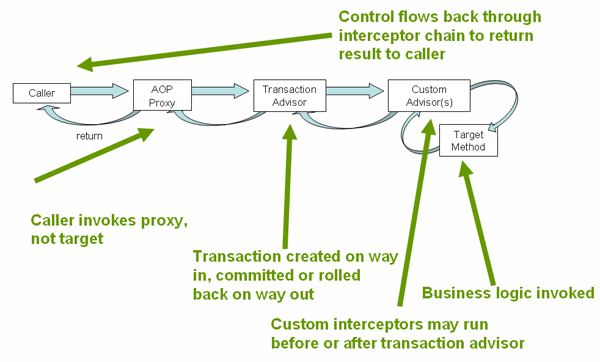
声明式事务管理基于Spring AOP实现,下图展示了声明式事务管理调用业务方法的过程(来自Spring官方)
@EnableTransactionManagement
在Spring中,启用声明式事务只需要在配置类中加上@EnableTransactionManagement注解即可。Spring中还有很多@Enablexxx注解,其实现原理大多类似。这个注解往容器中注入了以下Bean(默认配置下)。
- AutoProxyRegistrar
实现了ImportBeanDefinitionRegistrar接口,向容器中注入了AutoProxyRegistrar,而后者又向容器中注入了InfrastructureAdvisorAutoProxyCreator,它与AnnotationAwareAspectJAutoProxyCreator有同样的父类,实现原理与功能相似。 - ProxyTransactionManagementConfiguration
该类又往容器中注入了以下bean- AnnotationTransactionAttributeSource
这个类有属性为Set<TransactionAnnotationParser>,很显然,@Transactional注解由它负责解析 - TransactionInterceptor
所有的事务都会被它拦截,统一进行类似@Around注解的调用结构
- AnnotationTransactionAttributeSource
声明式事物的配置原理和AOP相似。
源码分析Spring事务的执行过程
本分析基于JDK动态代理,相信CGLib的大同小异,调用@Trasactional注解的方法直接进入InvocationHandler的invoke方法
final class JdkDynamicAopProxy implements
AopProxy, InvocationHandler, Serializable {
     public Object invoke(Object proxy, Method method, Object[] args) throws Throwable {
     /* 是否调用的特殊方法 */
     ...
     try {
	if (!this.equalsDefined && AopUtils.isEqualsMethod(method)) {
		// The target does not implement the equals(Object) method itself.
		return equals(args[0]);
	}
	else if (!this.hashCodeDefined && AopUtils.isHashCodeMethod(method)) {
		// The target does not implement the hashCode() method itself.
		return hashCode();
	}
	...
	if (this.advised.exposeProxy) {
	/* 暴露当前线程的AOP代理对象!,重要! */
	oldProxy = AopContext.setCurrentProxy(proxy);
	setProxyContext = true;
	}
	...
	/* 获取目标方法所有的Advice */
	List<Object> chain = this.advised.getInterceptorsAndDynamicInterceptionAdvice(method, targetClass);
	/* 直接调用原方法 */
	if (chain.isEmpty()) {
		Object[] argsToUse = AopProxyUtils.adaptArgumentsIfNecessary(method, args);
		retVal = AopUtils.invokeJoinpointUsingReflection(target, method, argsToUse);
	}
	/* 处理Advice链 */
	else {
		// We need to create a method invocation...
		MethodInvocation invocation =
				new ReflectiveMethodInvocation(proxy, target, method, args, targetClass, chain);
		// Proceed to the joinpoint through the interceptor chain.
		retVal = invocation.proceed();
	}
	...
}
- 方法中先判断是否调用特殊方法(toString、hashCode等);
- 是否暴露当前线程的代理对象;
- 获取Advice链,依次处理
继续跟进至TransactionAspectSupport中的invokeWithinTransaction方法
/* 获取事务属性元数据、隔离级别、超时时间等 */
TransactionAttributeSource tas = getTransactionAttributeSource();
final TransactionAttribute txAttr = (tas != null ? tas.getTransactionAttribute(method, targetClass) : null);
/* 根据事务元数据获取事务管理器,@Transactional中可选择配置事务管理器 */
final TransactionManager tm = determineTransactionManager(txAttr);
到这里,已经拿到了事务管理器以及目标方法事务的所有元数据,可以说都算准备工作,接下来执行真正的业务了,一步步分析
/* 这部分其实就是@Around功能 */
/* 1.是否需要开启事务 */
TransactionInfo txInfo = createTransactionIfNecessary(ptm, txAttr, joinpointIdentification);
Object retVal;
try {
	/* 2.执行业务函数 */
	retVal = invocation.proceedWithInvocation();
}
	/* 业务函数抛出异常 */
	catch (Throwable ex) {
	/* 根据异常决定是否回滚,若TrasactionStatus的isRollBackOnly为true,一定回滚,DefaultTransactionStatus为false */
	completeTransactionAfterThrowing(txInfo, ex);
		throw ex;
	}
	finally {
		cleanupTransactionInfo(txInfo);
	}
	...
	commitTransactionAfterReturning(txInfo);
}
- 是否需要开启事务,内部调用了TransactionManager的getTransaction方法获取TransactionStatus
DataSourceTransactionManager的getTransaction如下:
// Use defaults if no transaction definition given.
TransactionDefinition def = (definition != null ? definition : TransactionDefinition.withDefaults());
/* 封装了事务的相关信息 */
Object transaction = doGetTransaction();
/* 是否已开启事务,具体为当前数据库连接正在执行事务 */
if (isExistingTransaction(transaction)) {
	/* 该方法内部完全根据给定事务传播行为确定接下来的操作 */
	return handleExistingTransaction(def, transaction, debugEnabled);
}
...
// No existing transaction found -> check propagation behavior to find out how to proceed.
if (def.getPropagationBehavior() == TransactionDefinition.PROPAGATION_MANDATORY) {
	throw new IllegalTransactionStateException(
		"No existing transaction found for transaction marked with propagation 'mandatory'");
	}
else if (def.getPropagationBehavior() == TransactionDefinition.PROPAGATION_REQUIRED ||
		def.getPropagationBehavior() == TransactionDefinition.PROPAGATION_REQUIRES_NEW ||
		def.getPropagationBehavior() == TransactionDefinition.PROPAGATION_NESTED) {
		SuspendedResourcesHolder suspendedResources = suspend(null);
	try {
		return startTransaction(def, transaction, debugEnabled, suspendedResources);
	}
	catch (RuntimeException | Error ex) {
			resume(null, suspendedResources);
			throw ex;
	}
}
else {
	boolean newSynchronization = (getTransactionSynchronization() == SYNCHRONIZATION_ALWAYS);
	return prepareTransactionStatus(def, null, true, newSynchronization, debugEnabled, null);
}
完全依据给定的事务传播行为执行代码,得到的TrasactionInfo通过ThreadLocal绑定到当前线程
2. 确定了事务相关的行为(是否开启、隔离级别等),通过反射调用业务函数
3. 还原当前线程上一次事务(与事务传播机制有关),发生异常,是否回滚或提交
4. 未发生异常,提交
可以看到,事务传播机制是很关键的点,getTransaction方法几乎是围绕其展开的,那么到底什么是事务传播机制呢?为什么会有这个东西?
事务传播机制
透过ORM框架看事务
数据库的事务功能已经由数据库自身实现,它留给用户的就是三个指令:开启事务、提交事务和回滚事务。
开启事务一般是start transaction或begin transaction。提交事务通常都是commit。回滚事务通常都是rollback。
数据库通常都有自动开启事务和自动提交事务的开关,打开后,事务就会自动的开启和提交或回滚。这样用户就无感知了。
JDBC实现了访问数据库的协议,可以认为是对一些指令的封装,当然也包括这些事务指令。它们都被做到了java.sql.Connection这个接口里。
它代表到数据库的一个连接,当这个连接建立好后,默认事务就已经打开了,而且默认情况下执行完一个SQL语句后事务也是自动提交的。
通常情况下,我们都不希望事务是一句一提交,而是要执行若干个SQL语句后一次性提交,此时我们就需要改变这种自动提交的行为。
void setAutoCommit(boolean autoCommit);
当我们禁用掉自动提交之后,一定要记得自己手动提交事务,否则结果可想而知。当然,需要回滚的时候也要记得手动回滚。
void commit();
void rollback();
这样我们就可以在Java代码级别来控制事务的行为了。同时我们也应该认识到,在Java代码级别事务是和Connecton的实例对象绑在一起的。
换句话说,只有在同一个Connection对象上执行的SQL语句才会在同一个事务里。在不同的Connection对象上执行的SQL语句永远不会在同一个事务里。
更精确地说,后者构成的是分布式事务,前者通常称为本地事务。当然,分布式事务有属于自己的解决方案,只是不能再使用本地事务了。
平时我们使用框架进行开发,这些细节都被屏蔽了。
为什么有事务传播行为
事务传播行为是为了解决业务层方法之间互相调用的事务问题。举个例子
当事务方法被另一个事务方法调用时,必须指定事务应该如何传播。例如:方法可能继续在现有事务中运行,也可能开启一个新事务,并在自己的事务中运行。如下例子(只是为了举例说明,开发场景中当然不会这么写):
@Service
public class AccountServiceImpl implements AccountService {
    private final AccountDao accountDao;

    public AccountServiceImpl(AccountDao accountDao) {
        this.accountDao = accountDao;
    }

    @Transactional(isolation = Isolation.READ_COMMITTED, rollbackFor = Exception.class)
    @Override
    public void transfer(int id1, int id2, int money) {
	/* 错误的写法! */
        this.in(id2, money);
        this.out(id1, money);
    }

    @Transactional(rollbackFor = Exception.class, propagation = Propagation.REQUIRED)
    @Override
    public void in(int id, int money) {
        accountDao.in(id, money);
    }

    @Transactional(rollbackFor = Exception.class, propagation = Propagation.REQUIRES_NEW)
    @Override
    public void out(int id, int money) {
        accountDao.out(id, money);
    }
}
我们调用transfer方法时,transfer方法开启事务,接下来调用了in方法和out方法,这两个方法是单独开启事务,还是在transfer的事务中运行呢?
- 在transfer的事务中运行,那么具体到MySQL就是:
-- transfer方法的事务
BEGIN; # 开启事务
UPDATE xxx SET ...; # 转入
UPDATE xxx SET ...; # 转出
COMMIT; # 提交
# 整个过程发生异常则回滚
- 单独开启事务
-- transfer方法的事务
BEGIN; # 开启事务
# 等待in和out方法的事务完成
COMMIT; # 提交

# in方法的事务
BEGIN; # 开启事务
UPDATE xxx SET ...;
COMMIT; # 提交

# out方法的事务
BEGIN; # 开启事务
UPDATE xxx SET ...;
COMMIT; # 提交
当选择这种事务传播行为时,会先将transfer方法的事务挂起,开启in方法的事务,在这个事务里单独运行in方法的业务,in方法完成之后,out方法同理。这些逻辑都在DataSourceTrasactionManager中的getTransaction中。
Spring事务传播行为
上面说的只不过是事务传播行为中的两种,Spring规定的事务传播行为有以下几种(定义在TansactionDefinition接口中):
| 类型 | 说明 |
|---|---|
| PROPAGATION_REQUIRED | 如果当前没有事务,就新建一个事务,如果已经存在一个事务中,加入到这个事务中。这是最常见的选择。 |
| PROPAGATION_SUPPORTS | 支持当前事务,如果当前没有事务,就以非事务方式执行。 |
| PROPAGATION_MANDATORY | 使用当前的事务,如果当前没有事务,就抛出异常。 |
| PROPAGATION_REQUIRES_NEW | 新建事务,如果当前存在事务,把当前事务挂起。 |
| PROPAGATION_NOT_SUPPORTED | 以非事务方式执行操作,如果当前存在事务,就把当前事务挂起。 |
| PROPAGATION_NEVER | 以非事务方式执行,如果当前存在事务,则抛出异常。 |
| PROPAGATION_NESTED | 如果当前存在事务,则在嵌套事务内执行。如果当前没有事务,则执行与PROPAGATION_REQUIRED类似的操作。 |
| NESTED与REQUIRED_NEW的区别 |
为什么例子中写法是错的?
首先说结论:假如我们向上面这么写,无论怎么规定事务的传播行为,执行的效果永远是REQUIRED,为什么?
当我们在Controller层调用transfer方法时,我们调用的实际上是JDKDynamiCAopProxy的方法,真正transfer方法在这里被执行(此时已经开启了transfer方法事务)
retVal = invocation.proceedWithInvocation();
那么调用in方法和out方法的对象并不是JDKDynamicAopProxy对象,而是普通的UserServiceImpl对象,那么对in方法和out方法的调用就是普通的方法调用,根本没有走代理,整个业务过程只有一个transfer方法的事务!
如何解决
知道问题在哪就好办了,只要能够拿到代理对象就好了,有如下三种办法:
- 不使用嵌套调用,这样需要编写大量代码,业务方法复杂
- 在Service对象中注入自己,IOC中保存的就是代理对象
- 使用Spring提供的AopContext获取当前线程中活跃的代理对象
/* 配置暴露代理对象,默认关闭 */
@EnableAspectJAutoProxy(exposeProxy=true)

/* 在JDKDynamicAopProxy中 */
if (this.advised.exposeProxy) {
	/* 暴露当前线程的AOP代理对象!,重要! */
	oldProxy = AopContext.setCurrentProxy(proxy);
	setProxyContext = true;
}
...
if (setProxyContext) {
	/* 存储到ThreadLocal中 */
	AopContext.setCurrentProxy(oldProxy);
}

/* 使用 */
@Transactional(isolation = Isolation.READ_COMMITTED, rollbackFor = Exception.class, propagation = Propagation.REQUIRES_NEW)
@Override
public void transfer(int id1, int id2, int money) {
	AccountService service = (AccountService) AopContext.currentProxy();
        service.in(id2, money);
        service.out(id1, money);
}
根据MySQL日志验证
开启MySQL的general_log,调用transfer方法
@Transactional(isolation = Isolation.READ_COMMITTED, rollbackFor = Exception.class)
@Override
public void transfer(int id1, int id2, int money) {
        in(id2, 500);
        out(id1, 500);
    }

@Transactional(rollbackFor = Exception.class, propagation = Propagation.REQUIRES_NEW)
@Override
public void in(int id, int money) {
        accountDao.in(id, money);
}

@Transactional(rollbackFor = Exception.class, propagation = Propagation.REQUIRES_NEW)
@Override
public void out(int id, int money) {
    accountDao.out(id, money);
}
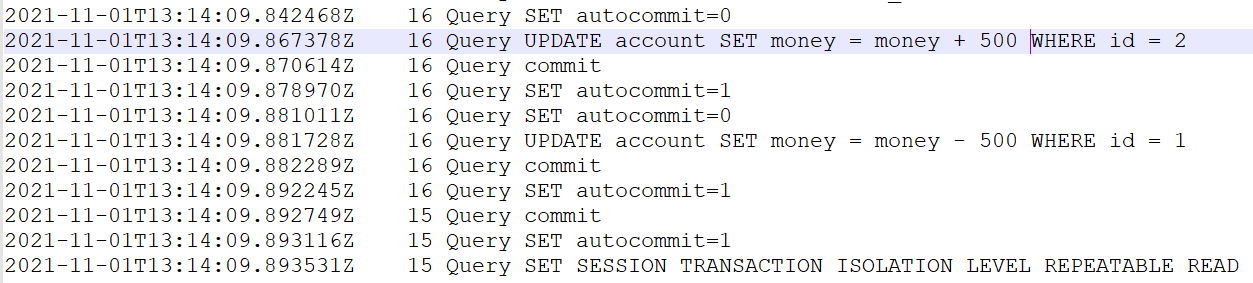
查看MySQL日志,如下

改变transfer方法
@Transactional(isolation = Isolation.READ_COMMITTED, rollbackFor = Exception.class)
    @Override
    public void transfer(int id1, int id2, int money) {
        AccountService accountService = (AccountService) AopContext.currentProxy();
        accountService.in(id2, money);
        accountService.out(id1, money);
    }
再次执行,查看日志
总结
Spring事务到此告一段落了,根本没想到会写这么多内容,从动态代理到AOP到事务传播机制、源码分析。网上的文章大多对几种事务传播机制列个表一通介绍就完事了,这些源码中都有,当时从网上寻求答案,未果,只好自己写了这篇文章了。
Q.E.D.